What to Expect from bioescaner molecular 3d precio in 2019*


What it bioescaner molecular 3d precio? bioescaner molecular 3d precio Training
What it bioescaner molecular 3d precio? bioescaner molecular 3d precio Training
NLS TRAINING MANUAL
Contents:
1. Introduction 3
2. NLS diagnostic 28
3. Microfrequency EHF-therap 40
4. Equipment – serial number 51
INTRODUCTION
This is a training program for use with the nonlinear diagnostic system – «DIACOM».
«bioescaner molecular 3d precio» refers to an entirely new class of devices, which are called “brain machines”.
What are they? At present, science and society in general, is faced with information
overload. Every day, there are large and small discoveries, every year there are dozens of new
machines and devices developed. This is certainly good. However, a person begins to drown
in this sea of information, losing the big picture.
A century ago a doctor for correct diagnosis required the experience of thousands of years of medical observation. Today this requires numerous and costly research and analysis. What helped the doctor to set the correct diagnosis? The answer is basically an inexplicable feeling called intuition.
However, modern science has come very close to unraveling the phenomenon of intuition, and even more mysterious phenomenon of clairvoyance. The point here is that this is not a miracle or divine grace, but electromagnetic vibrations of very low frequency, which can transmit information in the human brain, bypassing the usual senses. Of the 10 million
units of information only one is recognized, the others are fixed in the subconscious. Information from the sphere of the subconscious is extracted either spontaneously, or at the level of unusual, altered states of consciousness: hypnosis, dreaming, meditation, or while receiving psychotropic drugs.
The whole world, including the human race, is deeply interconnected through a variety
of informational signals. That’s why techniques to obtain information from the sphere of the subconscious, are recognized, while modestly, as priorities in the development of science and society in the next century.
Numerous studies in the field of Energy-Informatics led to the creation of fundamentally
new equipment capable of destroying the barrier between the conscious and the subconscious. This process (controlled research) is able to give an enormous amount of new information about the the surrounding world.
A special sphere of interest – medicine. These are new opportunities for diagnosis, different
from conventional ultrasound and computer tomography. An indispensable instrument for mass prophylactic examinations of the population.
Theoretical and experimental work, which made possible the development of «DIACOM» products, was initiated in the late I century by electronics genius Nikola Tesla. This was then continued by George Lakhovsky, a scientist who studied the effects of radio waves on animal health and condition of plants; American researcher R. Rife, who investigated the effects on the human body not only radio, but electro-frequencies. In 1950, R. Voll in Germany, discovered and developed a system of electrically testing the acupuncture points of human body. Voll’s method was the first hardware method of research of the energy-state of an organism. It is done by testing the rates of electromagnetic conductivity at the end points of acupuncture meridians in a
person using a special probe. The results of the study (in the form of digital or graphic indicators) may give an idea of the presence of inflammatory, dystrophic or atrophic pathology in the studied meridian and the corresponding organs. Another well-known method for diagnosing
the state of energy in a person -is Kirlian’s aura-diagnostics . It is used to determine the state of the electromagnetic field of a human in general. Status of individual organs is determined by the configuration of their biofield. NLS-diagnostic method allows the evaluation of the state of bio-energy of each organ individually. The results can be obtained in the form of visual ima ges with the topography of the affected area, as well as a graphical features which allow us to analyze damage to body tissue, allowing more accurately to determine not only the type of injury (inflammation or destruction), but also to clarify the diagnosis.Research is conducted by resonance amplification of radiation to the studied organ and then recovery of evidence via a non-contact method by using trigger sensors. The first version of a nonlinear analysis device had only a manual input of information,
that is a doctor was actively involved in the diagnosis of a patient, through the use of low-frequency vibrations that are close to the theta rhythm of the brain becomes more sensitive to
radiation in the body of the patient. The results were recorded using the deviation of an L-shaped frame held by the physician-operator on Flanders’s special scale (this scale is presented
in the diagnostic module of the program). However, this method of research is too subjective and not safe for the health of the physician operator. This led to the development and creation of so-called trigger sensor, providing automatic input of information about the health of the patient in the computer. On what is the effect of trigger sensors?
For the first time a distant effect of interaction with objects of animate and inanimate
nature, that is the transfer of data pulses from a man to machine was registered in the experiments of V.N. Kravkov in the 20-ies of our century. Under the guidance of prof. V. Togatova,
reactions of various semiconductor structures on the impact of bio-operators (psychic), were studied. It has been experimentally proved that the human brain without the aid of wires can have an affect the sensitive sensor device.
Software developers, in a dialogue mode between the telemetry complex and the physician operator with remote biofeedback, designed for the perception of the brain activity of
the operator or patient but depending on the objectives of the study and configuration of the complex and convert this information into a sequence of pulses with a special trigger sensor.
This is reflected in the fact that the human brain receives a signal about the need to verify
(test) this or that organ. The signal is fed to the monitor screen, as well as the head headphones in a series of electromagnetic waves peculiar to the healthy human body. This is possible because every organ and every cell in the human body has its own spectrum of electromagnetic waves. Thus we would like to ask the question – what is going on with the target organ?
In response to the question, the brain of the subject gives an answer that is perceived by the trigger sensors.
In the basic model, the «DIACOM» device offers a digital trigger sensor, simulated directly in the microprocessor of the main unit through the computer software and analog trigger sensor of the main research unit – pn-junction transistor, which increases the reliability of research.
The purpose of this training program is not a detailed physical justification of the principles of the «DIACOM» device, since different devices are designed differently. Currently, there are several manufacturers of this equipment, “spin-offs” from the original research group. In particular, in the original version of “DIACOM”, the headphones were used as magneto-inductors with an oscillation frequency, which is close to the theta rhythm of the brain, while in
later versions of the device – as a conductor of electromagnetic waves that are close to the alpha rhythm of the brain. A good effect is obtained from the use of electromagnetic waves as a trigger mechanism for the study of a healthy body.
Also, in many other versions of the device, laser emitters are used to affect the brain of the patient. Using the laser leads to an increase of the resonant response. However, there is a risk of adverse effects of such exposure, so the laser emitter is not used in all models of «DIACOM» equipment.
INTERFACE AND USE OF THE PROGRAM
POWERING UP
The computer is turned on first, then the location of the power switch is checked on the «DIACOM» device (depending on model, they may be different).
Once computer loads, on the desktop, find the program icon «DIACOM-NLS» (a globe).
Double-click the icon using the left mouse button. «DIACOM-NLS» begins to load.
To access the service menu, you should move the mouse cursor to the red dot next to the inscription DIACOM at the bottom right corner and with your left hand press on the keyboard keys Ctrl and Alt and at the same time click the left mouse button.
The service menu contains the following keys: CATALOG OF ORGANS-to create a database
for agencies. Users are not encouraged to go into this directory, because often after, the program hangs-up; PERSON FREE -mode settings of the program is used only once to determine
the speed of the program (described in the manual for installing and uninstalling DIACOM-NLS
programs); STANDARDS CATALOG -opens a directory of standards (organo-preparations, diagnoses, biochemical and microscopic studies, benchmarks of various drugs). Product standards
can be opened directly from the diagnostic window DIACOM-NLS, work with this will be described in the relevant section. Key Program settings -only used by programmers as a reference. MAIN MENU key -exit to the beginning of the program on the title page.
The main purpose of the title page – to open the main menu. To do this, click the left mouse button when the cursor is located anywhere on the title page. Then open the Main Menu.
It consists of four keys: Patients – opens a file of patients is the primary key; Settings – used to configure the work of some models of the equipment; ABOUT THE PROGRAM – the creators of the program, and EXIT – to exit to the program at the end.
RECORDS.
After we press PATIENTS, the RECORDS window opens.
The top row of keys, or RECORDS menu, begins with the word SEARCH and a window next to it. In this box, enter the last name of the patient, if they came on readmission and you need his RECORD file.
The keys, DOCTORS and STATEMENT, are necessary for proper organization of doctors in the study, if several doctors are working on the same computer at different times. The key with PHYSICIAN opens a list of physicians and this is where you can enter the registration mode of each physician individually (this compiles a separate list of patients for each doctor and a separate financial statement for each doctor).STATEMENT opens the financial report, which is produced separately for each doctor on the list (NB – when you remove the card the patient’s financial report on the study remains).
NEW key opens the card, in which we enter records for a new patient.
The keys, REMOVE and REMOVE BY DATE, are intended for deleting completed research (REMOVE -specific card; DELETE by date -to delete all the patients taken-in before a certain date).
MAIN MENU key – exit when finished.
PRINT CONCLUSIONS key – creates a job for a printer to print opinion, which the physician created independently and printed in the CONCLUSION window.
CONCLUSION window: The results (diagnoses, treatment regimens, etc.), that the doctor can create from preset blocks, available in the database computer or print yourself from the CONCLUSION window. This window is also used to call an alphabetical list of patients. To access the list of patients it is necessary to bring the cursor to the words: Person free (or Ve-geto-test), located in the upper right corner above the bottom of the
RESEARCH window. Simultaneously press on the keyboard keys Ctrl + Alt with the left hand, and click the left mouse button.
SCHEDULE Key – changes the image of an organ that is highlighted in the list of research with a dark line in the image graph of the study. It is seldom used.
INVESTIGATION Window . After research it appears in the list of studies
In the lower right corner are the control keys.
Two buttons under the words Person free: NEW – used if the patient is required to undertake additional examination at the primary admission; CONTROL – used for readmission to the beginning of research.
The keys, highlighted in blue under the word Handle, are not used because they have remained since the time when there was manual input of information.
ANALYSIS Key – includes entrance into the mode of analysis of the results.
ANALYSIS+ Key – includes entrance to the regime of comparative analysis (after the Ve-geto-Test or META-therapy)
PRINTING Key – includes entrance to the mode of printing the results (pictures and epicrisis composed of preset blocks)
REMOVE Key – removes the selected study.
FILLING OUT PATIENT CARD
After the FILES window opens, if a new patient, you should fill out a new card. To do this,
select NEW. A new patient’s card opens, in which you put down the patient’s name, age and
sex (to change the sex, you want to click on the arrow next to the small window next to the
word SEX. A small menu with two lines – M and F. Select the desired sex and click the left mouse
button). This is the minimum data necessary to get started. If you want, enter the address
and telephone number of the patient. Once the card is full, press OK.
Then there is a PAYMENT table. Press OK at the table.
INTERACTIVE HISTORY
After filling out the patient card and proof of payment, the INTERACTIVE history opens.
This window is designed to receive complaints and medical history (surgeries, previous infection and other established diagnoses). In the left panel is a schematic drawing of the human body (male or female) with control points on it in red. Each point corresponds to the
list of complaints and diagnoses specific to damage the organ, which are marked with the
points. For example, the point located in the area of the brain, is consistent with the complaints,
typical for pathology of the central nervous system, and a number of neuro-trophic
complaints (dryness and peeling of the skin, hair damage, etc.); point located in the epigastrium
– complaints that are characteristic of damage to organs of the upper gastrointestinal
tract. To access the list of complaints, it is necessary to bring the cursor to the selected point and click the left mouse button. Color point changes to green, and on the right pane a list of complaints comes up. If you’d like to note the diagnosis or resection you should click on the button Diagnosis on the right pane.
Select necessary complaints by ticking in the little box next to the complaint (for this move the mouse cursor to this window and click the left mouse button).
Collection of complaints is best done actively, descending from the top down. However, here every doctor picks up a working algorithm.
The model of the male organism is marked by three resections – resection of the thyroid gland, resection of the gallbladder and appendectomy (the point in the navel), the female organism model for resection has added resection of the uterus. Resection should always be selected. This is due to the peculiarities of Energy Research. An organ or part of the body that has been removed will be shown during the Energy Research either as a completely healthy (no organ – no problem) or will be shown at the state at the time of operation (due informational “memory”).
Isolation of these resections is associated with the fact that the gall bladder and appendix contains the pictures together with the liver and large intestine, so for cases with resections pictures will be used, which depict the liver without the gall bladder, and intestines – without appendectomy. Thyroid gland after resection is shown in reduced form, rather than the image of the uterus with the neck and part of the vagina in the study gets only the cervix with the vagina. Isolation of remaining resections only leads to that it is removed entirely from the study alonng with its histological structure, which is not always appropriate.
From the rather large spectrum of diagnoses, which may be mentioned in the collection
of history, it is better to use only for hypertension and Vegeto-vascular dystonia. The introduction of other diagnoses, including Botkin’s disease, can give you the overdiagnosis of these
states and make it difficult to diagnose associated diseases. On the Peculiarities of the diagnosis of hypertension, we shall discuss later, in analyzing the practical issues.
The number of complaints desirable for the proper functioning of the program, especially Vegeto-Test: 3-4. At first, we recommend that you use the complaint “Fatigue, weakness” since it gives overdiagnosis of pathology of the stomach, chest (Figure pectoral), adrenal and thyroid gland. This is due to the fact that the stress response that occurs during the examination of practically every patient, the stomach participates energetically – by increasing the production of cortisol, lungs – through the development of hyperventilation syndrome, adrenal glands – as the main gland through which are realized the stress response and thyroid
gland – as the organ responsible for the energy state of the organism. Later, when the accumulation of the database and self-tuning of the program, the introduction of the complaint
ceases to give such a pronounced change in the direction of the results of hyperdiagnostic stress response.
The optimal number of complaints to work with the program – 10-15.
When the complaint and medical history are collected, press CORRECTION. That brings
us to the next stage of research – Creating a list of studies. If you press research, that we will include a research program, generated automatically. Such a program, of course, can also lead to certain outcomes, but better in this case to rely on medical expertise and generate a list of research itself.
DEVELOP A LIST OF STUDIES.
Once you have pressed the correction key, information collection window opens. It has a left panel, showing our assembled complaints and diagnoses.
SPACE key on the left pane allows you to return to the window INTERACTIVE History and add a complaint in the way described above (choose a point and it notes the complaint).
Keys INSTALL, ADD, and REMOVE on the left panel allow you to work with a list of complaints and diagnoses, without leaving the Information Collection window. If you want to add a complaint you must first expand the list of complaints. To do this, click on the arrow next to the blank line
under the keys REMOVE etc. It reveals a full list of complaints, from which we select the target. Select, after which the complaint is automatically installed in the first blank line. Then press the ADD
button, in the list of allocated complaints appears an empty string. Then press the SET button, and the re-allocated complaint is set in the list of previously made complaints. If you want to remove the complaint, then select it, and then press the DELETE key.
We now turn to the right panel, in which the main work will take place . First we need
to expand the list of complaints. To do this, first press the button AUTO TUNE (it is located above the scheme of studies), then immediately press STEALTH (it is located to the left of the words scheme of studies). The first removes the auto-tune and opens a list of basic research, the second – makes a list of corrections, taking into account isolated complaints. When you first press on «AUTO TUNE, generate a list of studies you want, and then try to get started, you’ll see a requirement to increase the intuitive mode of analysis (Stealth), and then work on creating a list of studies that should be repeated again.
Once you expand the list of research, review it. Research in the list are always in a specific order in order to apply the principle of color selection. At the top of the list are studies that belong to the base directory. They are marked in blue, after the name of the study are the letters BC (base directory). This is mainly integrated studies, showing just a few organs. Been earmarked for the primary proximate express-analysis. It is recommended to include these studies in the list completely, to get the initial idea of the damage to major organs.
Next on the list of studies in pink are isolated organs of the gastrointestinal tract, then -emerald
green -the organs of the respiratory system, then brown -the organs of the genitourinary
system (at the end of the list for women pistachio color studies of breast).Next comes the study of the cardiovascular system, blood and lymph to the lymph vessels of the mediastinum, the endocrine glands, nervous system (in the top lines -the spinal cord, lower -the brain), sensors (eyes, ears, hair, nails), musculoskeletal and chromosomes.
It is recommended to compile a list of research so that in it every organ was represented in the form of a whole organ, and in the form of micro-preparations (histological structure of the body). Micro preparations are displayed in the original list with the letters MC.
In addition, the list you may find studies, allocated by the letter V. This is a rotating three-dimensional models of organs.
Those studies, which are expected to take place, will be checked. If you need to add the study, tick the box next to the study, which you have chosen. If you need to remove the study, place your mouse over the box next to the studies which you want to delete and click the left mouse button. A check mark will disappear, and the study will be excluded from the list.
Once you thus adjusted the list of necessary research, you need to press STUDY highlighted in red.
Besides the mentioned keys is the Clear and ALL keys, located directly above the right pane.
You can press Clear to remove all the checkboxes. This is useful when you want to conduct a partial examination of the patient, for example, only the thyroid gland. In this case, we press the button Clear remove all the checkboxes, and then put checks next to the studies of the thyroid gland.
Once you press Clear in its place appears RESTORE key. If you press this key, then you will
have selected all shown in the scheme of studies. ALL key functions similarly to the key RESTORE.
In the Collection of Information window on the right panel is a few more keys.
FILES Key -includes access to the files windows (main box).
IMAGE CAPTURE Key -if we press this button, the selected image appears with a dark outline. If the study has been conducted, it shall be allocated with control points (different colors). If
the study is conducted, then the picture will have the entropic icons that emerged from the study.
CIRCUIT and EVALUATION OF LESIONS Keys are used for isolation and evaluation centers.
Detailed work with these keys will be described in the relevant section of the topic “Diagnostics”.
PREPARATIONS Key includes the manufacture reprint of the drug. REPRINTER duplicates the keys in the analysis window and the window for diagnosis and testing.
ANALYSIS key is used to connect to the mode of analysis (diagnosis and testing). It duplicates the key ANALYSIS in the files. It is used most often in cases where a partial survey is conducted and there is ability to select the organ for the analysis directly in the scheme of the study window Collection of information (of course, after it is completed).
THERAPY key opens META-therapy, duplicates Therapy key in the analysis window .
When the investigation is complete, you receive the table of the research results. Click OK, and then press FILES above the list of studies.
If you want to stop the study, use the STOP and Files keys that exist in those windows, which is testing the control points and the construction of graphics.
CONDUCTING DIAGNOSIS AND TESTING OF MEDICINE
When the investigation is finished, diagnosis should be set, that is, to provide the alleged diagnosis, as well as a selection and testing of drugs or dietary supplements. To do this, enter the diagnostic mode and testing, which is opened by key ANALYSIS.
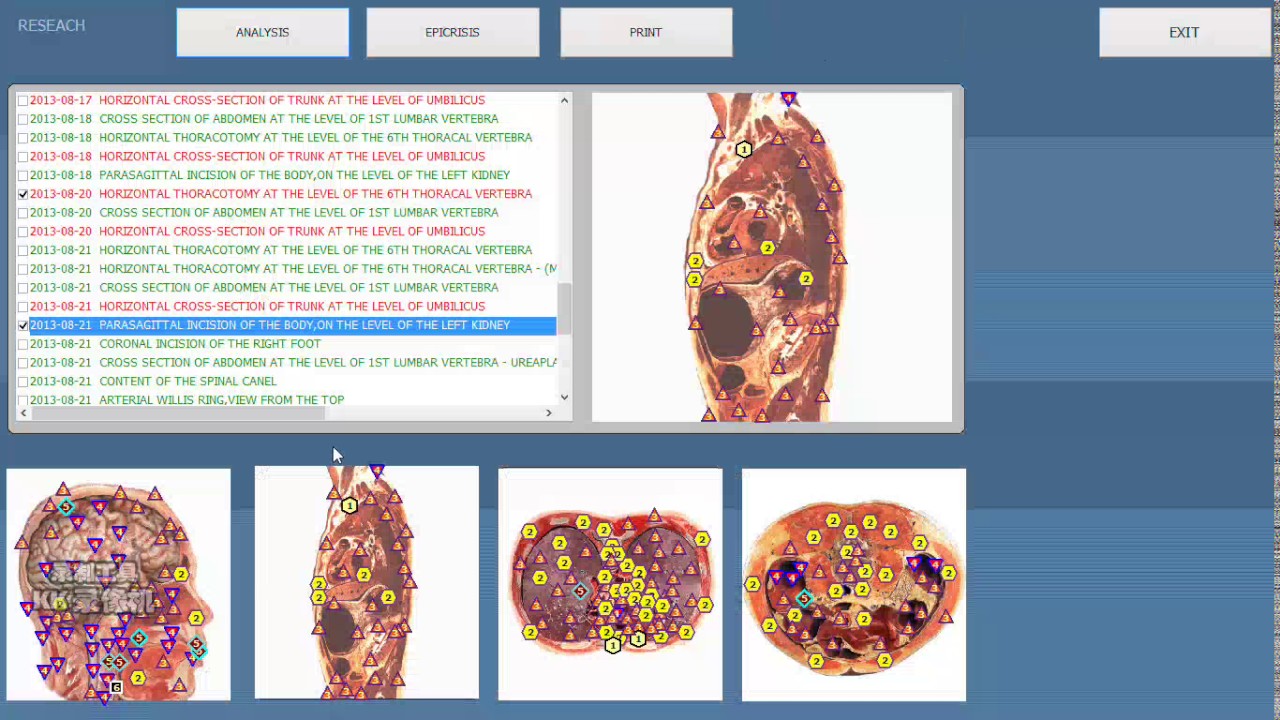
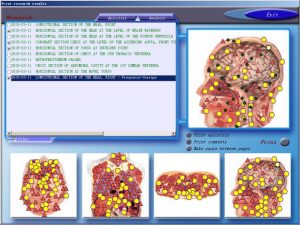
There are three ANALYSIS keys in the program: in the DATA COLLECTION box, FILE window, and PRINT RESEARCH RESULTS window (hereinafter PRINT …). All these allow access to the diagnostic and test mode . ANALYSIS key in the DATA COLLECTION window is rationally used in carrying out partial surveys. After the VEGETO-TEST, this key is disabled. ANALYSIS Key in the FILES window is used most often. Diagnosis and testing mode of the PRINT window has its own peculiarities. This is, firstly, the ability to quickly view images, which is especially important if during the study the doctor is asked a question or distracted by something else.
To view the pictures, simply switch the working string with one line to another. List of studies includes more lines and you can immediately see which organs and systems are damaged.
On a separate note, the list of completed studies (as in FILES window and Print window
…), different studies are allocated to different color. Green color identifies those studies whose pictures are entropy icons of 1 to 4, in red -those in the pictures that have at least one 5, brown -those in the pictures that have at least one 6. Thus, the most damaged organs are immediately differentiated using the brown color in the list of studies, the least damaged – green.
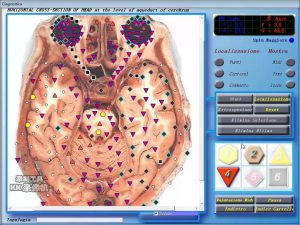
After selecting a study for which we will carry out diagnosis and testing, click ANALYSIS key. Analysis window opens in a large window.
Here we can examine in detail the picture to provide a snippet (you must use the magnifying glass in the upper left corner of the picture). Now click the cross in a loop, it turns into
a dash, then the mouse leads to a selected starting point, click the left mouse button and stretches a selection window in the right direction to select the sample.
Double-click the left mouse button to fix the fragment.
In addition, this window is convenient to call the text support. To do this, press key TEXT under the word “Show”. In the picture appear green crosses. To get the text, you must move the mouse cursor to the green crosses. When the cursor reaches the cross, text in small print will appear. If the mouse cursor moves away from the cross, the text disappears. To keep the text fixed, it is necessary at the appearance of text, to click the left mouse button. A large-type text table appears. NB – green crosses indicate the presence of text support, which can be retrieved using the method described above.

How to use bioescaner molecular 3d precio?
How to use bioescaner molecular 3d precio?
1.Turn on the instrument and operate the detection software
First, thank you very much for purchasing bioescaner molecular 3d precio (bioescaner molecular 3d precio) equipment systems, when you receive the equipment, make sure the following
equipment is complete:
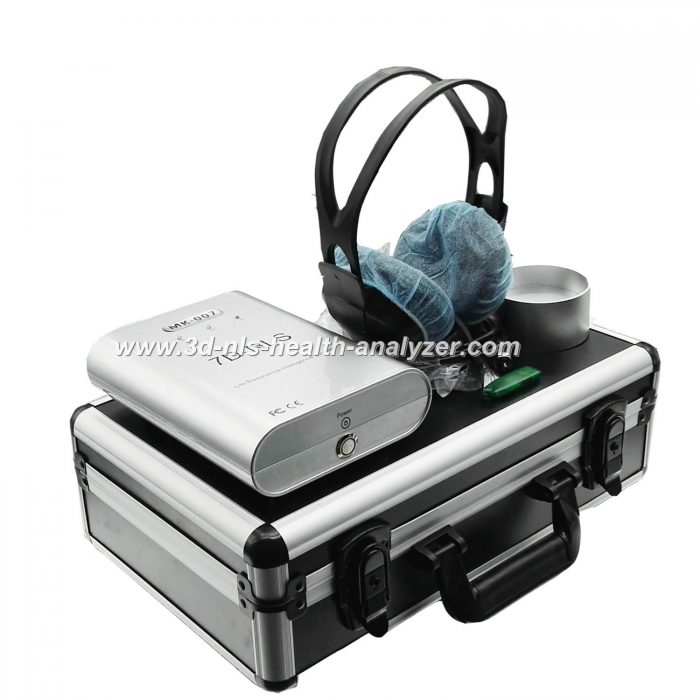
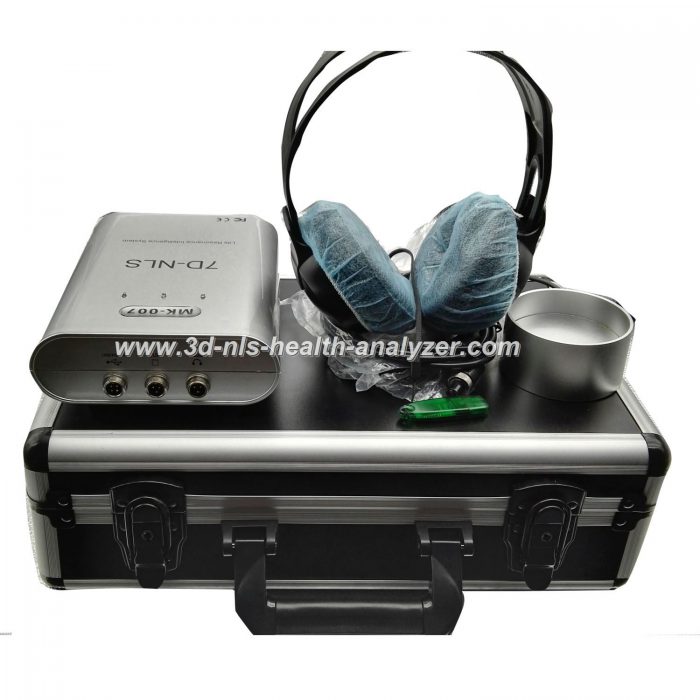
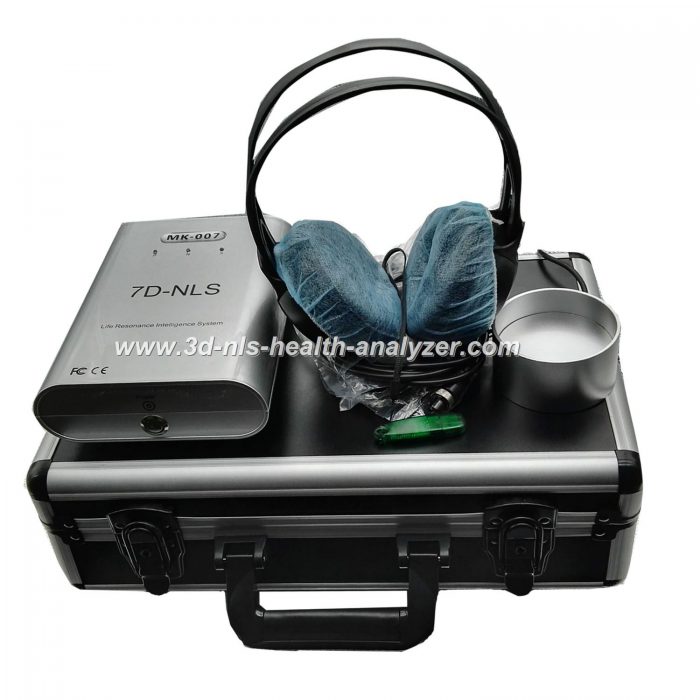
1.bioescaner molecular 3d precio Device Host *1
2.Headset signal sensor *1
3.The laptop *1 (Samsung/HP i3)
4.USB cable *1
5.The Operating Instructions * 1
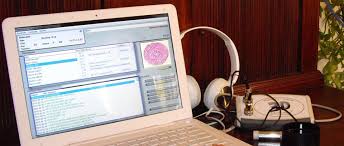
Before the instrument is turned on, make sure the following things connect correctly :
1.USB: The computer signal cable connect to the equipment
2.POWER: The power switch on
3.:Plug in the Headset transmitter .
Starting up sequence:
Open the computer -Insert the USB into your computer – Switch on the device (power) —
Put on the headset after 20 seconds
Double-click the computer desktop icon into the detection system.

What bioescaner molecular 3d precio advantage?
What bioescaner molecular 3d precio advantage?
· It allows the visualization of the corporal functioning according to the own chronobiology of each individual.
· Identify structural disease.
· Dynamic and precise analysis
· Non-invasive technological procedure, which allows an exhaustive diagnosis of the functioning of each organ and its internal functions; evaluating through the scanning system and in 3D, the bioelectrical level of the main structures of the human body.
· Determines the potential risk of suffering from certain pathologies.
· General condition of organs. In addition to detect the organ and diseased systems.
bioescaner molecular 3d precio health analyzer through light waves, sonar, through the eardrum in the human brain, using quantum resonance applied to probe techniques of specific organs of the body tissues of the hydrogen energy Atomic, the resonance of electromagnetic waves and then feedback to the computer, compared to a huge database, which allows detection of the pathologies of organs currently, past, and in an upcoming period of 3 ~ 5 years.
1) The technology of the bioescaner molecular 3d precio is not invasive, the patient will not feel any discomfort before or after the test. The voltage of the electrical stimulation does not cause any damage to the skin, it is not reactive, therefore there is no possibility of radiation, it does not produce side effects.
2) It only takes 30 minutes to quickly analyze and detect the state of the body and the assessment of the patient’s health status by exploring 3D body organs.
3) 12 systems of the human body and its tissues can be detected, changes, comparison of the scan range up to 300 exams.
4) It allows a clear evaluation of the risk of suffering certain pathologies, giving the patient the possibility of reducing an attack and giving him the opportunity to achieve the effect of prevention. The bio-scan allows us to obtain a clear analysis about the behavior of the organism and health in a period of 3 ~ 5 years.
5) bioescaner molecular 3d precio technology fuses spectral resonance, quantum resonance analysis and acoustic resonance analysis.
6) Test different foods / products for health care affect the circumstances of the body.
7) Detection function and automatic check of 12 systems (heart, lung, brain, liver, etc …) 256 reports of glands, cells etc, accurate prediction of 4,352 types of diseases based on the check of 120,000 body points users can see their organs now, in the past and the tendency to their health and the organization of future cellular vitality in a period 3 to 5 years.
8) Function of analysis: You can analyze foods and health products by verifying if they can have a beneficial or harmful effect by establishing a balance for the organism.
9) Treatment and repair function: With the restoration by means of energy of the spectrum and the function of repair, it attacks in an early stage the disease even preventively. This effect is especially applicable for the repair of pain points with auxiliary healing effect.

What’s the bioescaner molecular 3d precio principle?
What’s the bioescaner molecular 3d precio principle?
bioescaner molecular 3d precio to light waves, sonar, through the eardrum into the human brain, use of quantum resonance techniques to probe the specific organs of the body tissue of the hydrogen atomic energy, the resonance of electromagnetic waves and then feedback to the computer, Compared with fine huge database,thus find the detection organs present, past, and the next 3-5 years, the health status database was establish by famous scientists of the former Soviet Union and the United States which spent 35 years, spending tens of billions of national research funds, a collection of different sex,different ages, different races, different diseases, different the clinical data.

What is bioescaner molecular 3d precio?
What is bioescaner molecular 3d precio?
Russian were the first to create an automatic and informative technology independent of any human influence, capable of a ”cellular communication” with the help of frequencies which control the cellular frequencies. Thus any functional anomalies can be corrected by the help of emulation of frequencies which have been included in the given data in the PC.
The first technological approaches were developed for scientific use, and were based on the principle that “the body is a great communication system” capable to react to exterior electromagnetic radiations.
The Physiospect technique made for therapists, came out of this scientific experiment.
It is made to be in contact with the body,without actual skin contact, and connected to a personal computer with a sophisticated software.
the essential in short of bioescaner molecular 3d precio
♣bioescaner molecular 3d precio Analyzer defines causes and connections of the disorder on a bio-energetic level and differentiates them.
♣ bioescaner molecular 3d precio Analyzer reproduces the bio-energetic status of all organs and tissues down to the cellular and molecular level.
♣ bioescaner molecular 3d precio Analyzer scans the human body and visualizes with precision health disorders of all kinds.
According to the same principles, bioescaner molecular 3d precio Analyzer is capable of measuring oscillations of remedies such as food supplements, homeopathic remedies, etc. By means of this function, it can find the most efficient remedy for the patient.
bioescaner molecular 3d precio Analyzer can identify which therapeutic remedy works best and which burdens are present. Physiospect determines not only the type of burden but also identifies the severity of the burden.
After the measurement, bioescaner molecular 3d precio Analyzer can treat the client with the function META Therapy. The user can observe the effectiveness directly on the screen. A comparative analysis shows the changes that take place before and after treatment.
bioescaner molecular 3d precio Analyzer shows in which development stage the disorder is in and if the process is acute or chronic.
Furthermore with a new added function it is possible to determine how the disorder will develop in the future. This allows to discover if a therapy is suitable or if the body can solve the problem by itself.

We are MAIKONG 3d nls health analyzer | 3d nls health analyzer price | Metatron 4025 Hunter | original 3d DIACOM nls|www.3d-nls-health-analyzer.com,manufacturers Unified Wholesale price.Welcome to inquiry and OEM.
Related Items